Web Socket
\Web Socket이란, 클라이언트와 서버가 연결을 설정하고 실시간으로 통신을 가능하게 한 기술이다.
대표적인 통신 기술인 HTTP는 단방향 통신이지만, Web Socket은 양방향 통신을 사용한다.
(참고) HTTP 통신과 Web Socket 통신의 차이점
HTTP 통신과 다른점은 HTTP 통신은 요청 ~ 응답 까지만 연결이 유지된다.
하지만 Web Socket 통신은 한번 연결을 시도하고, 이루어지면 따로 연결을 끊지 않는 이상 계속 연결 상태가 유지된다. → Stateful Protocol
이 연결을 토대로 양방향 통신을 시도한다.
또한 Web Socket 을 양방향 통신이라고 부르는 이유는 HTTP 통신 처럼 클라이언트가 요청을 보내면 서버가 응답하는 방식을 사용하지만, Web Socket 은 클라이언트가 서버에 요청을 보내면, 서버가 구독 목록을 통해 클라이언트에게 요청을 보낼 수 있기 때문이다.
STOMP
STOMP란, Simple Text Oriented Messaging Protocol 의 약자로, Web Socket 과 같은 양방향 통신을 기반으로 하는 간단한 메시지를 전송하기 위한 프로토콜이다.
publish ↔ subscribe 을 기반으로 동작하고, 메시지 발행자 (메시지 보내는 유저) → 메시지 브로커 → 메시지 구독자 (메시지 받는 유저) 흐름으로 진행된다.
대표적인 메시지 브로커 기술이 RabbitMQ, Kafka이다.
- STOMP 형태
COMMAND
header1 : value1
header2 : value2
Body^@
- COMMAND : 메시지 타입을 나타냄
- CONNECT : 연결 요청
- SEND : 메시지 전송 요청
- SUBSCRIBE : 구독 요청
- header1, 2 : 추가 정보를 나타내는 헤더
- Body : 메세지에 담을 내용
Web Socket을 사용한 실시간 채팅 흐름
- 채팅을 하고자하는 유저끼리 채팅방이 개설된다. 이들은 같은 주제를 구독하게 된다.
- 만약 채팅방에서 메시지를 전송하고자 한다면 메시지 브로커에게 메시지를 보낸다.
- 여기서 필요한 정보는 메시지 브로커 URL, 메시지를 수신할 엔드포인트 (주제), 메시지 Body 이다.
const stompClient = new StompJs.Client({ brokerURL: 'ws://localhost:8080/gs-guide-websocket' });- StompJs.Client 를 사용해 Web Socket 클라이언트를 생성하고, Spring STOMP 엔드포인트 에 연결
// 발신 function sendName() { stompClient.publish({ destination: "/app/hello", body: JSON.stringify({'name': $("#name").val()}) }); }- /app/hello 주제로 name의 내용을 담아 메시지를 발행
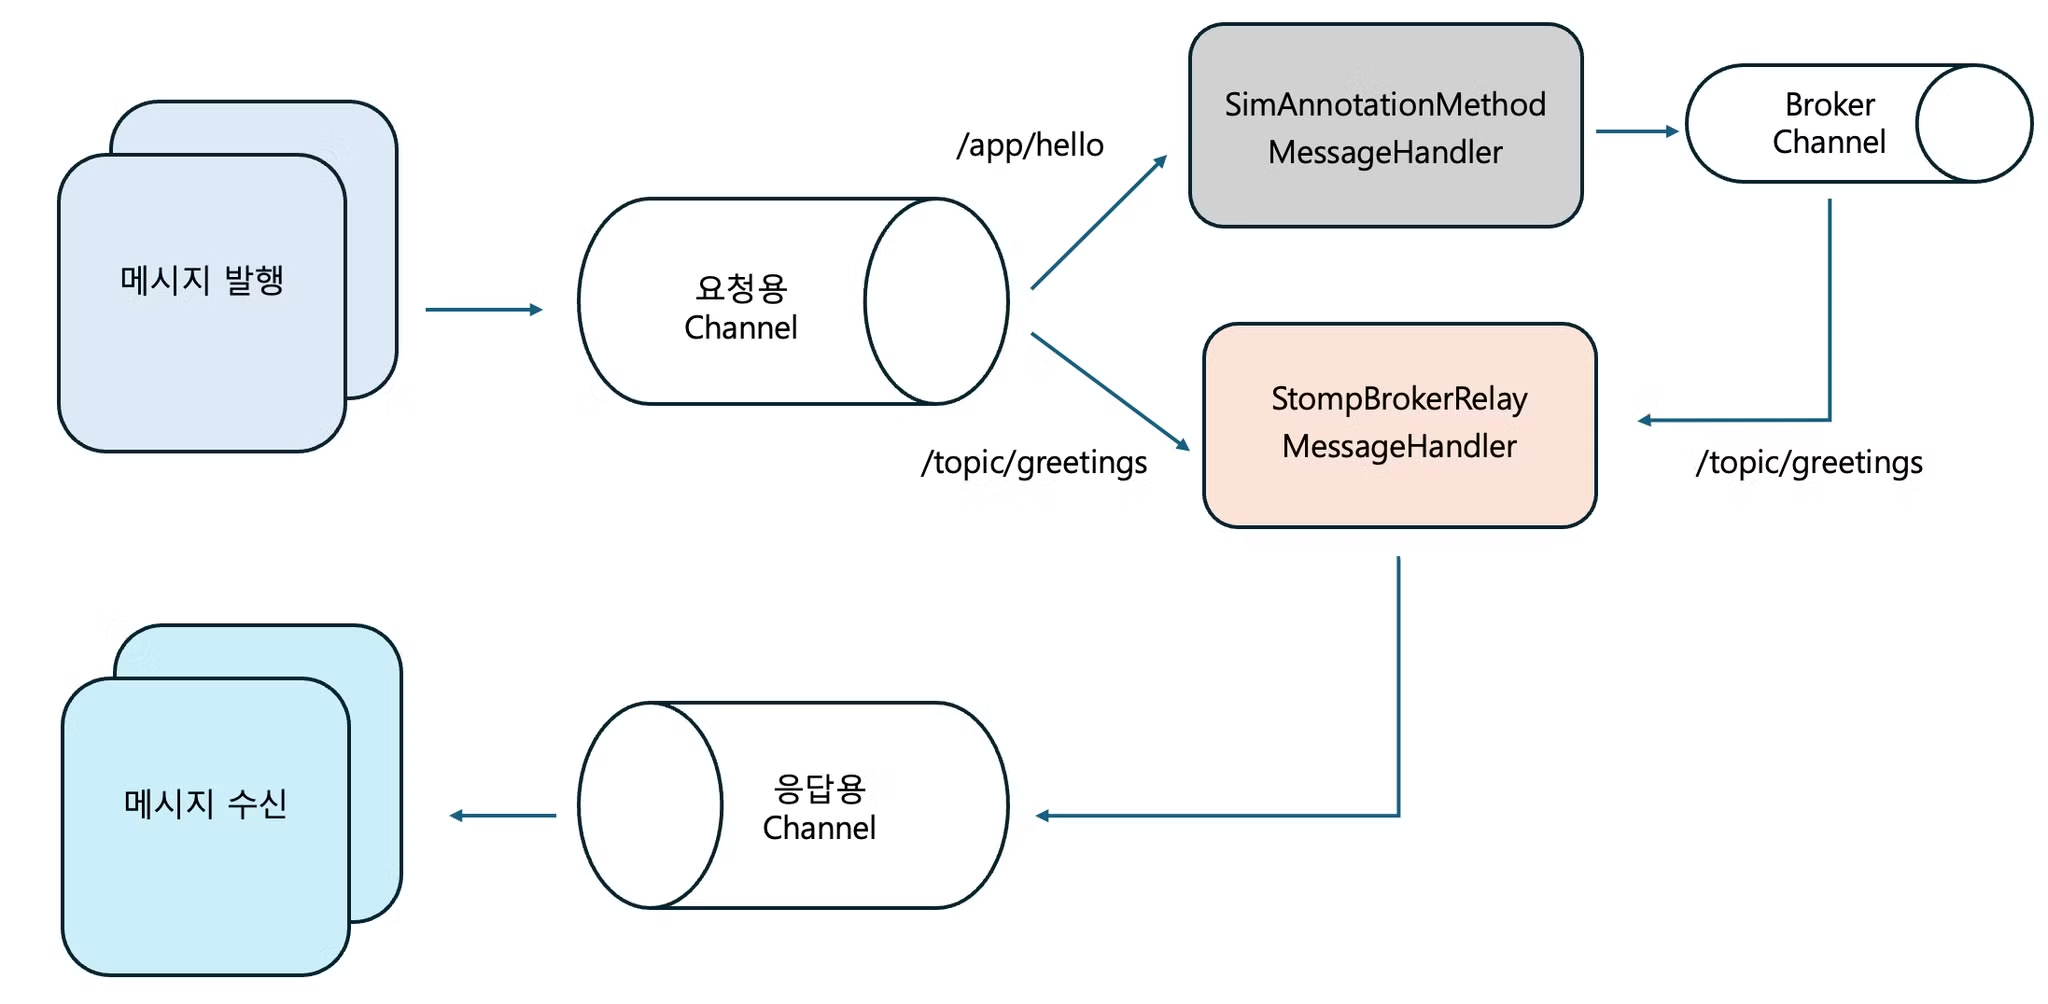
@Controller @RequiredArgsConstructor public class GreetingController { @MessageMapping("/hello") // 메시지를 수신할 엔드포인트 : /app/hello @SendTo("/topic/greetings") // 메시지를 발신할 주제 : /topic/greetings public Greeting greeting(HelloMessage message) throws Exception { Thread.sleep(1000); // simulated delay return new Greeting("Hello, " + HtmlUtils.htmlEscape(message.getName()) + "!"); } }- 발신한 메시지를 처리할 엔드포인트 : /app/hello
- 메시지를 발신할 주제 : /topic/greetings
- 메시지를 전송했다면, 해당 주제를 구독하고 있는 유저들에게 메시지가 전송되고, 유저들이 메시지를 수신한다.
stompClient.onConnect = (frame) => {
    setConnected(true);
    console.log('Connected: ' + frame);
    stompClient.subscribe('/topic/greetings', (greeting) => {
        console.log("Send Message!!");
        showGreeting(JSON.parse(greeting.body).content);
    });
};- 채팅방을 개설할 때 onConnect 콜백이 호출되는데, 이 때 연결상태를 true 로 변경
- 메시지를 수신할 주제를 /topic/greetings 로 설정

- MessageHandler를 2개로 나눈 이유는 두 핸들러의 목적이 다름
- SimAnnotationMethod : 발행된 메시지 Body 의 전처리가 필요한 경우
- 전처리를 모드 거치면 StompBrokerRelay 에게 전달됨
- ex) DB, Redis 저장, JWT(Access Token) 검증
- StompBrokerRelay : 전처리가 필요없고, 같은 주제를 구독한 유저들에게 전송만 하면 되는 경우
예제 코드
Getting Started | Using WebSocket to build an interactive web application
'Spring' 카테고리의 다른 글
| [Spring] Spring 프로젝트 SonarQube 연동 (0) | 2025.01.09 |
|---|---|
| [Spring] Spring Batch를 사용한 대량 데이터 저장 (2) (0) | 2024.12.22 |
| [Spring] Spring Batch를 사용한 대량 데이터 저장 (1) (3) | 2024.12.21 |
| [Spring] Controller 테스트 코드 (Feat : Spring Security) (1) | 2024.12.19 |
| [Spring] Spring Boot + Web Socket(STOMP) (2) (1) | 2024.09.26 |